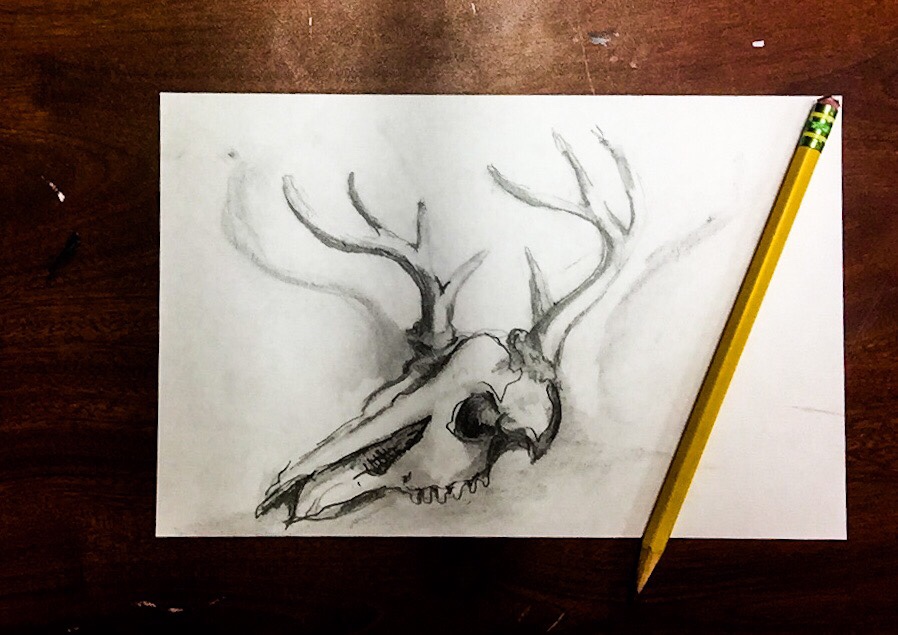
How to Draw a Deer Skull
1. Begin by sketching the basic outline of a deer skull, including the eye sockets and nose holes.
2. Use light pencil strokes to draw the antlers, starting from the base and working your way up each side. Add details like bumps and ridges along their length as desired.
3. Draw in the jawbone, making sure you get all of its curves correctly before adding any details or shading to it.
4. Give the skull some definition by creating shadows between bones with a darker pencil such as an HB or 2B pencil for more detail work. Make sure to leave lighter sections where highlights should be placed on later steps (e.g., around eye sockets).
5 . Create texture within each bone by lightly drawing small lines that will become furrows when shaded properly later on in your drawing process (if desired).
6 .
Finally add color using either colored pencils or watercolor paints if you wish to make your deer skull more realistic looking!
- Begin by drawing the outline of the skull using light pencil strokes
- Start with a curved line for the top edge, and then draw two curves that meet in a point at either side to make the shape of a deer’s skull
- Outline the eye sockets and nasal cavity using small circles or ovals for each one
- Add an oval behind them to represent where its antlers would be placed on its head if it were still alive
- Shade in any areas around these shapes to give dimension to your drawing, such as shadows between furrows or bumps on bone structure like you’d find on a real deer skull
- Use hatching techniques – short lines drawn close together – when shading in large areas so that they look more natural instead of just plain black lines across the paper 4
- Draw details like cracked teeth, ridges along the jaw line and other features that are unique to deer skulls by adding thin jagged lines over certain areas (like cracks) or outlining different parts of their anatomy (like jaw bones)
- You can also use cross hatching for some added texture too! 5 Draw any additional details you’d like such as mossy vines growing from crevices or even tufts of fur hanging off its snout if desired; anything goes! Lastly, erase all unnecessary pencil marks before coloring in your work with colored pencils/paints etc
How to draw Deer Skull step by step
How Do You Draw a Skull Step by Step?
Drawing a skull is easier than you might think! Start by drawing an oval for the cranium and add two circles for the eyes. Next, draw a line from each eye to the center of the oval, then add another curved line above them to form the brow ridge.
From there, draw two curved lines on either side of your original oval shape to create cheekbones. After that, sketch two arcs around each eye socket and connect these with short lines at their centers. Lastly, add details such as teeth and nose holes by connecting small ovals in various shapes and sizes within your skull outline.
With some practice you’ll be able to draw a realistic looking skull in no time!
How Do You Draw a Simple Skull Bone?
To draw a simple skull bone, start by sketching an oval with two curves on each side for the eye sockets. Next, draw the nose hole in between the eyes and add two curved lines at the bottom of it to form nostrils. Then, draw a jagged line across the top of the oval for the teeth and another one just above it for the jaw line.
Finally, add details like cracks or texture to make your skull look more realistic. Don’t forget to erase unnecessary lines from your drawing before you move onto coloring or shading!
How Do You Draw a Classic Skull?
To draw a classic skull, start by sketching an oval shape with two circles at the bottom for the eyes and two curved lines between them for the nose. Draw four lines from the top of each eye to create a cross that marks where the jaw will be located. Next, draw in more details such as cheekbones and teeth that are visible in many classic skulls.
Finally, add shading and texture to give your drawing depth and realism. Be sure to take your time with this process since it’s important to capture all of these small details correctly if you want an accurate representation of a classic skull.
How Do You Draw a Skull Shape?
Drawing a skull shape is quite easy to do and only requires basic drawing skills. Start by lightly sketching an oval shape with a cross in the middle. On each side of the cross, draw two curved lines that point outward from the center line and connect at the end of the oval.
Once you have your basic outline, start fleshing out details such as eyes, nose, mouth and other facial features. You can also add texture to give it a more realistic look by shading in areas like cheekbones or forehead wrinkles with darker colors or using pencils for finer details like teeth or hair strands. Finally, once you’re satisfied with your finished product, erase any unnecessary lines and use different shades of gray or black to bring out its true form!

Credit: www.youtube.com
How to Draw a Deer Skull Side View
Drawing a deer skull side view can be a challenging task, but with the right steps and guidance, you can create an accurate representation of this iconic animal. Start by sketching out the basic shape of the skull including its long snout and curved top. Next, draw in details like eye sockets, antlers (if present), and any other facial features that are visible from the side view.
Finally, add shading to give your drawing more realism before signing off on your work! With practice and patience, you’ll soon be able to draw realistic looking deer skulls from every angle!
Conclusion
Drawing a deer skull is an enjoyable and accessible project for any artist, regardless of skill level. It’s a great way to practice your drawing skills while also creating something beautiful that you can be proud of. With the help of this guide, you now know all the necessary steps to draw a realistic-looking deer skull with ease.
So grab your pencils and paper and start creating!