How to Sight in a Scope for 100 Yards: Expert Tips and Tricks
Sighting in a scope for 100 yards is essential for accurate shooting. First, align your scope correctly with your target.
Having a properly sighted scope can make all the difference in your shooting accuracy. Whether you are a beginner or experienced shooter, learning how to sight in your scope at 100 yards is crucial. This process ensures your shots are accurate and consistent.
In this guide, we will walk you through the steps needed to achieve this. By the end, you’ll be confident in hitting your target every time.
Choosing The Right Scope
Choosing the right scope is crucial for accurate shooting. The right scope ensures you hit your target every time. There are various types of scopes to consider, each offering unique features. Let’s dive into the specifics.
Types Of Scopes
Different types of scopes cater to different needs. Here are the most common:
- Fixed Power Scopes: Simple and reliable. They have a set magnification level, such as 4x.
- Variable Power Scopes: Versatile and adjustable. They allow changing magnification, like 3-9x.
- Red Dot Scopes: Ideal for close range. They offer quick target acquisition with a red dot reticle.
- Holographic Scopes: Advanced and precise. They use a holographic reticle for better accuracy.
Magnification Levels
Magnification levels determine how close you see your target. Here’s a simple breakdown:
| Magnification Level | Best Use |
|---|---|
| 1-4x | Close range, up to 100 yards |
| 5-8x | Medium range, 100-200 yards |
| 9-12x | Long range, over 200 yards |
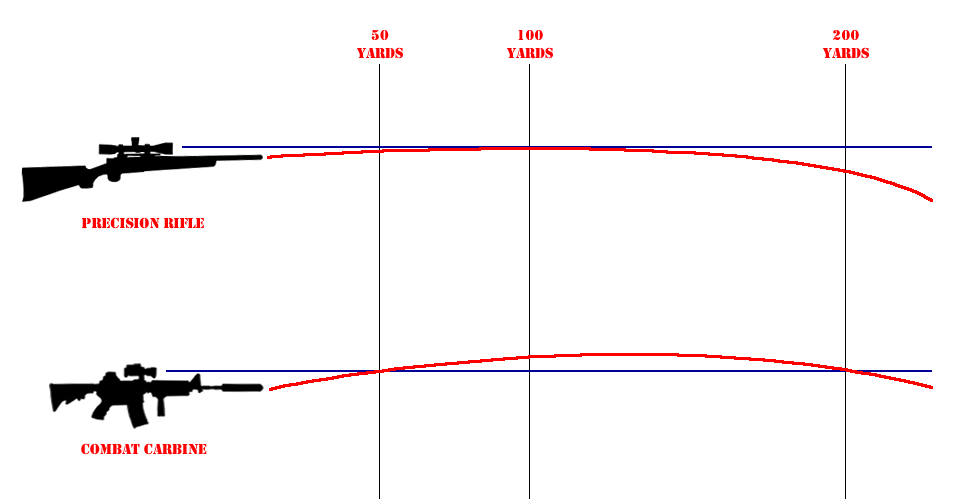
For sighting in at 100 yards, a scope with 3-9x magnification works well. Adjust the magnification based on your target size and distance.
Credit: 8541tactical.com
Mounting The Scope
Mounting the scope is the first step in sighting in your rifle for 100 yards. Properly mounting the scope ensures accuracy and precision. This process requires careful attention to detail. Let’s break down the essential steps.
Tools Needed
You will need specific tools to mount your scope correctly. These include a screwdriver set, a torque wrench, and scope rings. A bubble level is also helpful. Ensure all tools are within reach before starting.
Proper Alignment
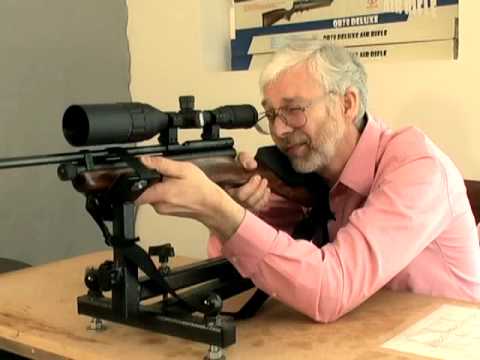
Proper alignment is crucial for accuracy. Place the rifle in a stable position. Use a gun vise or a shooting rest. This prevents the rifle from moving during the process.
Attach the scope rings to the rifle’s mounting base. Do not fully tighten them yet. Place the scope in the rings and check its alignment. Ensure the reticle is level. Use a bubble level for this step.
Adjust the scope’s position for eye relief. This is the distance from your eye to the scope. It ensures a clear view without straining your neck. Once the scope is positioned correctly, tighten the screws gradually. Use the torque wrench to avoid over-tightening.
Double-check the alignment. Make sure everything is secure. Your scope is now mounted, and you’re ready for the next steps in sighting in.
Setting Up Your Shooting Position
Before sighting in your scope for 100 yards, you need a solid shooting position. This ensures accuracy and helps you make precise adjustments. Let’s focus on the essential elements of setting up your shooting position.
Stability And Comfort
Stability and comfort are crucial for an accurate shot. Choose a location with a flat surface. Avoid uneven ground, as it can affect your aim. Position yourself comfortably to reduce fatigue. Proper posture is vital.
Keep your feet shoulder-width apart. Bend your knees slightly. Ensure your back is straight. Rest your elbows on a firm surface. This minimizes movement and enhances stability. Use a shooting mat or a cushion if needed. Comfort plays a key role in maintaining focus.
Shooting Bench Setup
A shooting bench can significantly improve your shooting accuracy. Follow these steps to set up your shooting bench:
- Choose a sturdy bench with a flat, level surface.
- Position the bench so that you have a clear view of the target.
- Ensure the bench height allows for a natural shooting posture.
- Place sandbags or a rifle rest on the bench for added stability.
- Use a chair or stool that provides proper support and comfort.
Adjust the bench and rest to fit your body size. Make sure your rifle is secure. This setup helps you maintain a consistent shooting position. Consistency is key to accurate sighting.
With stability and comfort in place, you’re ready to sight in your scope. Remember, a stable shooting position leads to better accuracy and precision. Now, let’s move on to the next steps of sighting in your scope.
Initial Bore Sighting
Initial Bore Sighting is the first step in sighting in your scope for 100 yards. This process ensures that your scope and barrel are aligned. It saves time and ammunition by getting your shots on paper quickly. There are two primary methods for initial bore sighting: using a bore sighter and manual bore sighting.
Using A Bore Sighter
A bore sighter is a handy tool. It helps align your scope with the barrel of your rifle. This tool can be either a laser bore sighter or a magnetic one. Here are the steps for using a bore sighter:
- Attach the bore sighter: Insert the bore sighter into the barrel of your rifle. Ensure it’s secure and aligned properly.
- Adjust the scope: Look through your scope. Adjust the windage and elevation knobs. Align the crosshairs with the dot or grid on the bore sighter.
- Remove the bore sighter: Take out the bore sighter from the barrel. Your scope should now be roughly aligned with the barrel.
Using a bore sighter can be quick and effective. It helps get your shots close to the target at 100 yards.
Manual Bore Sighting
Manual bore sighting is a more traditional method. It doesn’t require any special tools. Here’s how to do it:
- Secure your rifle: Place your rifle on a stable surface. Use a gun vise or sandbags to hold it steady.
- Remove the bolt: Take out the bolt from your rifle. This allows you to look through the barrel.
- Align the barrel with the target: Look through the barrel. Center the target in the bore.
- Adjust the scope: Without moving the rifle, look through the scope. Adjust the crosshairs to align with the target.
- Recheck alignment: Look through the barrel again. Ensure the target is still centered. If not, repeat the adjustments.
Manual bore sighting can be just as effective. It may take a bit longer but is a reliable method.
Both methods are essential for initial bore sighting. Choose the one that best suits your needs and equipment.
Adjusting Windage And Elevation
Adjusting windage and elevation is a vital step in sighting in a scope. These adjustments help align your scope with your target. Proper adjustments ensure accuracy at 100 yards.
Understanding The Turrets
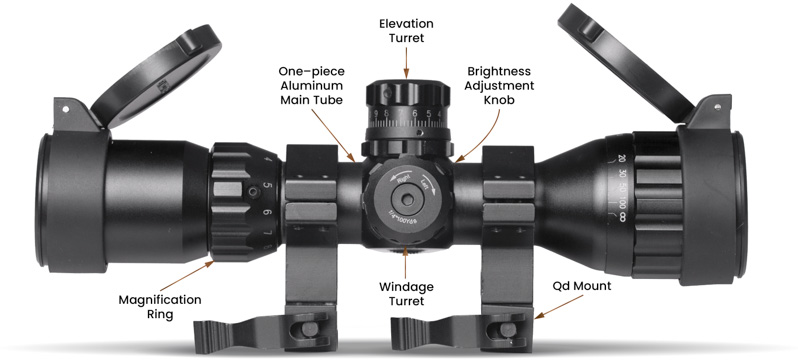
Turrets are the knobs on your scope. They control windage and elevation. The windage turret adjusts the horizontal aim. The elevation turret adjusts the vertical aim. Each click on the turret makes a small adjustment. Usually, one click equals a quarter-inch change at 100 yards.
Making Initial Adjustments
Start by setting up your rifle on a stable platform. Use a rest or bipod for stability. Aim at the center of your target. Fire a shot and check the impact point. Adjust the windage turret to move the impact left or right. Adjust the elevation turret to move the impact up or down.
Make small adjustments and fire again. Repeat this process until your shots consistently hit the target center. Remember to keep your movements controlled and deliberate.
Taking Initial Shots
Properly sighting in your scope at 100 yards starts with taking initial shots. This step is crucial for ensuring accuracy and precision. Follow these simple steps to get started.
Aiming At The Target
First, set up your target at exactly 100 yards. Ensure the target is visible and well-marked. Use a stable shooting bench or a bipod for support.
Next, adjust your scope’s magnification. A higher magnification helps you aim better. Center the crosshairs on the target’s bullseye. Take a deep breath, hold it, and gently squeeze the trigger.
Recording Shot Placement
After taking the shot, check where it hit the target. Use a spotting scope or walk to the target. Record the shot placement on a piece of paper or in a shooting log.
Here is a simple table to help you record your shots:
| Shot Number | Hit Location | Adjustment Needed |
|---|---|---|
| 1 | High Right | Lower Elevation, Left Windage |
| 2 | Low Left | Increase Elevation, Right Windage |
Make the necessary adjustments to your scope based on the recorded data. Continue this process until your shots consistently hit the bullseye.
Fine-tuning The Scope
Fine-tuning your scope ensures precise shooting at 100 yards. This process involves making small adjustments to your scope. These adjustments help improve accuracy and consistency. Let’s dive into the details of fine-tuning your scope.
Correcting For Windage
Windage correction adjusts the horizontal alignment of your scope. To do this, you need to move the reticle left or right. Begin by firing a few rounds at the target. Observe where the bullets hit. If they land left of the target, adjust the windage knob to the right. If they land right of the target, adjust the knob to the left. Make small adjustments and fire another round. Repeat until your shots are aligned horizontally with the target.
Correcting For Elevation
Elevation correction adjusts the vertical alignment of your scope. This helps you hit the target at the desired height. Start by firing a few rounds and observe the bullet impact. If the bullets hit below the target, adjust the elevation knob upward. If they hit above the target, adjust the knob downward. Make small adjustments and fire another round. Continue this process until your shots are vertically aligned with the target.
By carefully correcting for windage and elevation, you can achieve precise accuracy at 100 yards. Remember to make small adjustments and test each change. Patience and practice are key to fine-tuning your scope.

Credit: tpwd.texas.gov
Verifying Accuracy
Verifying accuracy ensures your scope is precisely sighted at 100 yards. This process helps confirm that your adjustments are accurate and consistent. Let’s break down the steps to verify your scope’s accuracy.
Consistent Shot Groups
First, focus on shooting consistent shot groups. Aim at the center of the target and fire three to five rounds. Check the grouping of your shots. They should be close to each other. This indicates that your scope is aligned correctly.
If your shot groupings are scattered, recheck your setup. Ensure the rifle is stable and you use the same aiming point for each shot. Consistent shot groups are key to verifying accuracy.
Making Final Adjustments
Once you achieve consistent shot groups, make final adjustments. If your shots are off-center, adjust the scope’s windage and elevation knobs. Move the point of impact closer to the bullseye.
Make small adjustments. Fire another group of shots to confirm the changes. Repeat this process until your shots are hitting the center of the target.
Final adjustments ensure your scope is accurate at 100 yards. This step is crucial for precision shooting. Take your time and make sure each adjustment brings you closer to perfect accuracy.
Maintaining Your Scope
Sight in a scope for 100 yards by starting with a stable shooting position. Adjust the windage and elevation knobs until the crosshairs align with the target’s center.
Your scope is an essential tool. It requires proper care for accurate shooting. Regular maintenance ensures it remains in top condition. Neglecting it can lead to poor performance. Let’s explore some key maintenance steps.Cleaning The Lenses
Clean lenses provide clear vision. Dust and dirt can blur your view. Use a soft brush to remove debris. Avoid using rough materials. They can scratch the lenses. A lens cleaning solution can be helpful. Apply it with a microfiber cloth. Gently wipe in circular motions. Keep your lenses clean for better accuracy.Checking For Loose Screws
Loose screws can affect your aim. Inspect your scope for any loose parts. Use a screwdriver to tighten them. Be gentle to avoid damage. Check the mounting screws too. They hold the scope in place. Tighten them if needed. Regular checks prevent issues. Keep your scope secure for consistent shooting. “`
Credit: m.youtube.com
Frequently Asked Questions
How Do You Sight In A Scope At 100 Yards?
To sight in a scope at 100 yards, set up a target at that distance. Adjust your scope’s windage and elevation knobs until your shots consistently hit the bullseye.
What Is The Best Magnification For 100 Yards?
For 100 yards, a scope magnification of 3x to 9x is ideal. It provides a clear view and enough detail for precise shooting.
How Many Clicks On A Scope For 100 Yards?
The number of clicks depends on your scope’s adjustment increments. Typically, 1/4 MOA per click means four clicks move the point of impact one inch at 100 yards.
What Distance Should I Zero My Rifle Scope?
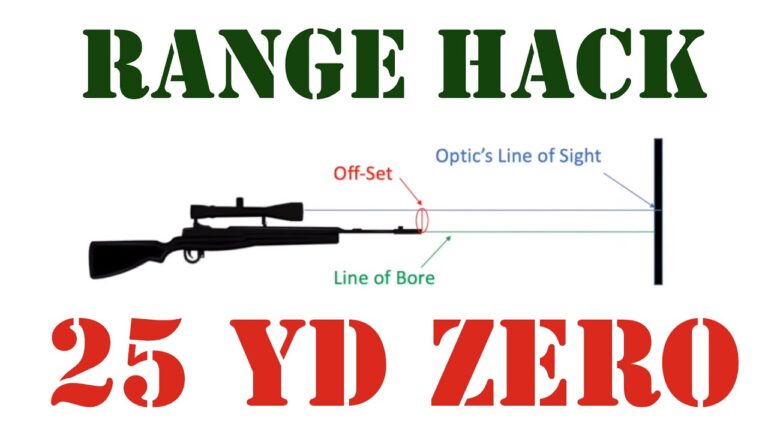
Zeroing your rifle scope at 100 yards is common. It provides a good balance for medium-range shooting and allows for easier adjustments at different distances.
Conclusion
Sighting in a scope for 100 yards is a straightforward process. Follow the steps provided to ensure accuracy. Start with a stable position and proper alignment. Adjust the windage and elevation dials carefully. Take your time with each shot. Practice regularly to maintain precision. Additionally, it’s important to verify your target’s positioning and ensure your shooting range is safe and clear. If you’re new to using this type of equipment, look for instructional materials or videos that specifically explain how to sight in a thermal scope. Consistent practice will not only improve your skills but also boost your confidence in utilizing your equipment effectively.
Remember, patience and practice lead to better results. Enjoy your improved shooting accuracy. Happy shooting!

