How to Sight in a Red Dot: Expert Tips for Precision
Learning how to sight in a red dot can seem tricky at first. But with the right steps, it becomes simple.
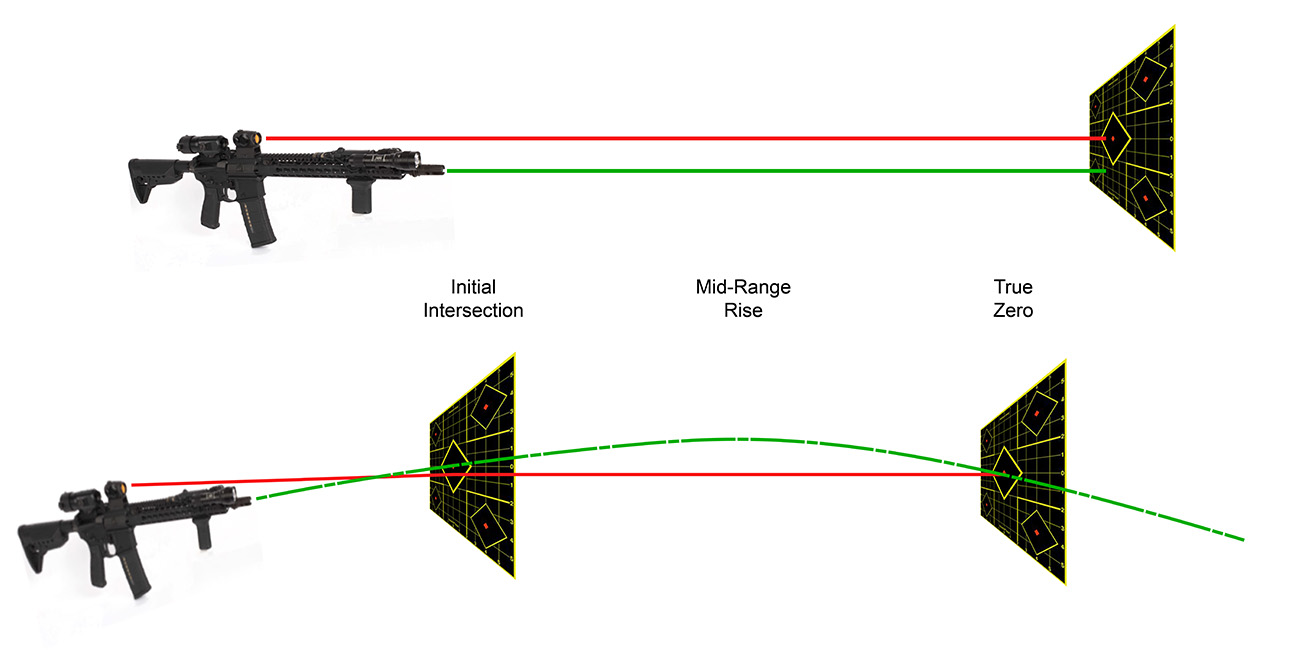
Red dot sights are popular for their speed and accuracy. Whether you’re using one for hunting, target shooting, or home defense, correctly sighting in your red dot is crucial. This process ensures your shots hit where you aim. It involves adjusting the sight so the dot aligns with your point of impact.
Follow these steps to ensure your red dot sight is accurate and reliable. Let’s dive in and get your red dot sighted in perfectly.

Credit: tacticon.com
Choosing The Right Red Dot Sight
Learning how to sight in a red dot is essential for accuracy. Start by mounting the sight securely on your firearm. Then, adjust the windage and elevation settings until the red dot aligns with your target.
Choosing the right red dot sight is crucial for accuracy. Your choice affects how well you hit the target. Different types of red dot sights suit different needs. Understanding your options can help you make the best decision.Types Of Red Dot Sights
There are several types of red dot sights. Tube-style sights are common and versatile. They offer a range of brightness settings. Open or reflex sights are lightweight. They have a wide field of view. Holographic sights use lasers and mirrors. They provide a clear and precise reticle. Each type has its own benefits and drawbacks.Factors To Consider
Consider the size of the red dot. Smaller dots offer more precision. Larger dots are easier to see quickly. Think about battery life. Some sights have longer battery life than others. Look at the durability of the sight. You want a sight that can withstand rough conditions. Check the mounting options. Make sure the sight fits your firearm. Also, consider the price. Higher-priced sights often offer better features. “`Mounting The Red Dot Sight
Mounting the red dot sight correctly is crucial for accuracy. A proper mount ensures stability and precision. This section will guide you through the steps to mount your red dot sight effectively.
Proper Positioning
Position the sight on your firearm’s rail. Ensure it is close to the middle. This balances the weight. Avoid placing it too far forward or back.
Check the eye relief. You should see the red dot clearly. Adjust the position if needed. Comfort and clarity are key.
Securing The Mount
Once positioned, secure the mount. Use a screwdriver or the provided tool. Tighten the screws firmly. Do not over-tighten. This could damage the sight.
Double-check the alignment. The sight should be straight. Ensure all screws are tight. A loose mount affects accuracy.
Initial Setup
Setting up a red dot sight can seem difficult. With some simple steps, it becomes easy. The initial setup is crucial. It ensures your red dot works as it should. Let’s start with the basics: battery installation and adjusting brightness.
Battery Installation
First, check the battery compartment. Open it using a small screwdriver. Insert the battery with the positive side facing up. Close the compartment securely. Make sure the red dot turns on.
Here’s a quick checklist:
- Open the battery compartment
- Insert the battery (positive side up)
- Close the compartment
- Turn on the red dot
Adjusting Brightness
Next, adjust the brightness. The red dot should be visible, but not too bright. Use the brightness adjustment buttons. There are usually two buttons: up and down.
Follow these steps:
- Turn on the red dot sight
- Look through the sight
- Press the “up” button to increase brightness
- Press the “down” button to decrease brightness
- Find a level where the dot is clear but not glaring
Proper brightness is important. It helps you see the red dot clearly. Too bright and it can blind you. Too dim and you might miss it. Adjust until it feels right.

Credit: www.80percentarms.com
Bore Sighting
Bore sighting is an essential step in sighting in a red dot. This process aligns the bore of the firearm with the red dot sight. It ensures you hit your target accurately. Bore sighting saves time and ammunition. It’s a crucial part of setting up your firearm for success.
Using A Bore Sight Tool
To begin, you’ll need a bore sight tool. These tools come in various types. Some fit directly into the barrel. Others are magnetic and attach to the muzzle. Choose the one that fits your firearm best.
Insert the bore sight tool into the barrel. Ensure it’s secure and straight. This tool projects a laser beam. The laser shows where your barrel is pointing. It’s your guide for aligning the red dot.
Aligning The Sight
Once the bore sight tool is in place, adjust your red dot sight. Look through the sight and find the laser dot. Use the windage and elevation adjustments. Align the red dot with the laser dot.
It’s crucial to do this step carefully. Small adjustments make a big difference. Check and recheck until the dots overlap.
Now, remove the bore sight tool. Take your firearm to the range. Fire a few rounds to confirm your adjustments. Fine-tune as needed. You’ve successfully sighted in your red dot.
| Step | Description |
|---|---|
| 1 | Insert bore sight tool into barrel |
| 2 | Ensure it’s secure and straight |
| 3 | Adjust red dot sight to align with laser dot |
| 4 | Remove tool and test fire |
Adjusting Windage And Elevation
Adjusting windage and elevation is crucial for accurate shooting with a red dot sight. Proper adjustments ensure your shots hit the target as intended. Follow these steps to fine-tune your red dot sight.
Making Windage Adjustments
Windage adjustments move the point of impact left or right. Use the following steps:
- Locate the windage adjustment knob or screw. It is usually on the side of the sight.
- Turn the knob or screw to the left to move the point of impact left.
- Turn the knob or screw to the right to move the point of impact right.
- Make small adjustments and test after each change.
Remember to keep your adjustments small. This prevents over-correcting.
Setting Elevation Correctly
Elevation adjustments move the point of impact up or down. Follow these steps:
- Find the elevation adjustment knob or screw. It is usually on the top of the sight.
- Turn the knob or screw clockwise to lower the point of impact.
- Turn the knob or screw counterclockwise to raise the point of impact.
- Make small adjustments and test after each change.
Small, precise adjustments ensure better accuracy. Avoid making large changes at once.
| Adjustment Type | Direction | Action |
|---|---|---|
| Windage | Left | Turn left |
| Windage | Right | Turn right |
| Elevation | Up | Turn counterclockwise |
| Elevation | Down | Turn clockwise |
By following these steps, you can achieve precise adjustments. This will help you hit your target consistently.
Fine-tuning At The Range
Fine-tuning at the range is essential to ensure your red dot sight is accurate. This process involves making precise adjustments to your sight’s settings. It helps to achieve the best shooting performance. Let’s break this down into a few easy steps.
Establishing A Zero
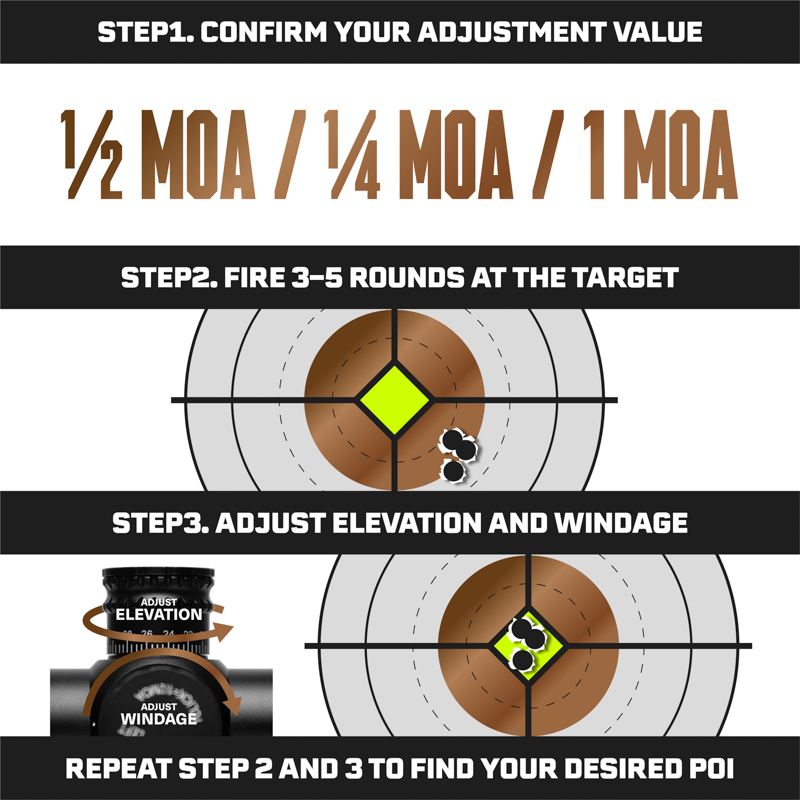
Before you start shooting, set your target at an appropriate distance. Typically, 25 to 50 yards is a good range. Ensure your firearm is steady by using a bench rest or sandbags. Follow these steps:
- Align the red dot sight with your target.
- Take a few test shots while aiming at the center.
- Check the impact points on the target.
- Adjust the sight settings based on the impact points.
Repeat this process until your shots consistently hit the target’s center. This is known as “establishing a zero”.
Confirming Accuracy
Once you’ve established a zero, it’s crucial to confirm the accuracy of your adjustments. Move to different distances to see how the sight performs. Follow these steps: Once you’ve established a zero, it’s crucial to confirm the accuracy of your adjustments. Follow these steps: First, take a series of test shots at varying ranges, observing the point of impact relative to your aim. Next, fine-tune the adjustments based on your findings, ensuring that your sight remains true across distances. Finally, seek out resources or tutorials on how to align a red dot to further refine your technique and enhance your shooting accuracy.
- Set your target at a farther distance, such as 100 yards.
- Take a few shots and observe the shot grouping.
- If the shots are not centered, make small adjustments to the sight.
- Repeat until the shots are consistent and accurate.
Confirming accuracy ensures your red dot sight is reliable at various distances. It boosts your confidence during shooting sessions.
Quick Tips:
- Always use the same type of ammunition during sighting.
- Keep track of your adjustments to avoid confusion.
- Practice regularly to maintain accuracy.
Common Mistakes To Avoid
When learning how to sight in a red dot, beginners often make common mistakes. These errors can affect accuracy and performance. Knowing these mistakes helps you avoid them and improves your shooting experience.
Over-tightening Screws
Over-tightening screws is a frequent mistake. Tightening screws too much can damage your equipment. This may lead to misalignment or even breakage.
Follow the manufacturer’s recommended torque settings. Use a torque wrench if available. This ensures screws are tight enough without being over-tightened.
Ignoring Environmental Factors
Another common mistake is ignoring environmental factors. Wind, light, and even temperature can affect your sighting process. Not considering these can lead to inaccurate adjustments.
Here’s a quick table to help you understand how different factors can affect your sighting:
| Environmental Factor | Effect on Sighting |
|---|---|
| Wind | Can push the bullet off course |
| Light | Affects visibility and sight clarity |
| Temperature | Impacts the bullet’s trajectory |
Pay attention to these factors. Adjust your sight accordingly. This will help you get a more accurate shot each time.

Credit: www.youtube.com
Maintenance And Care
Maintaining your red dot sight is crucial for its longevity. Regular care ensures optimal performance. Neglecting it can lead to inaccuracies. Let’s explore how to keep your red dot sight in top shape.
Cleaning The Lens
Dust and debris can accumulate on the lens. This affects visibility. Use a soft brush to remove loose particles. A microfiber cloth can help clean the lens. Avoid using harsh chemicals. They can damage the lens coating. Opt for lens cleaning solutions instead.
Checking For Wear And Tear
Regularly inspect your red dot sight for wear. Look for any cracks or chips. Check the mounting system. Ensure it is secure. Loose mounts can affect accuracy. Examine the battery compartment. Clean any corrosion that you find. Replace old batteries promptly. This prevents power issues during use.
Frequently Asked Questions
What Distance To Sight In A Red Dot?
Start at 25 yards for initial sighting. Adjust and then confirm accuracy at 50 to 100 yards.
How To Adjust A Red Dot Sight?
Turn the elevation and windage knobs. Move the dot until it aligns with your point of aim.
Do You Need To Zero A Red Dot Sight?
Yes, zeroing ensures the red dot aligns with the point of impact, enhancing shooting accuracy.
What Tools Needed For Sighting In A Red Dot?
You’ll need a target, a stable shooting rest, and a sight adjustment tool or screwdriver.
Conclusion
Mastering the art of sighting in a red dot improves your accuracy. Practice regularly to maintain your skills. Follow the steps outlined to achieve better results. Use quality equipment for consistent performance. Remember, patience is key. Stay calm and focused.
Adjust as needed to match your shooting style. Enjoy the improved precision in your shots. Happy shooting!


