How to Sight in a Nightforce Scope: Expert Tips & Tricks
To sight in a Nightforce scope, start by mounting the scope securely. Next, adjust the windage and elevation settings.
Precision in shooting depends on a well-sighted scope. Nightforce scopes are renowned for their accuracy and durability. Learning to sight in your Nightforce scope is crucial for optimal performance. This process ensures that your shots hit the intended target. Whether you are a seasoned shooter or a beginner, understanding the steps to sight in your scope can make a significant difference.
This guide will walk you through the essential steps. Follow these simple instructions to improve your shooting accuracy. Let’s dive in and fine-tune your Nightforce scope for the best results.

Credit: www.optics-trade.eu
Introduction To Nightforce Scopes
Nightforce scopes are known for their high-quality optics. They offer excellent clarity and precision. Hunters and shooters prefer Nightforce for reliability. These scopes perform well in various conditions. This makes them a top choice for many.
Features And Benefits
Nightforce scopes come with several features. They provide great benefits for users.
- Superior Glass Quality: Ensures clear and sharp images.
- Durable Construction: Built to withstand harsh environments.
- Advanced Reticle Designs: Helps in precise aiming.
- Wide Magnification Range: Suitable for various shooting distances.
- Illuminated Reticles: Enhances visibility in low light.
These features make Nightforce scopes reliable. They are trusted in the field.
Why Choose Nightforce
Choosing Nightforce scopes offers many advantages. They provide unmatched performance and durability. Here are key reasons to choose Nightforce:
- Precision Engineering: Nightforce uses advanced technology. This ensures accurate and reliable performance.
- Robust Build: Scopes are made with high-quality materials. They are resistant to shocks and impacts.
- Versatility: Suitable for various applications. Ideal for hunting, tactical, and competitive shooting.
- Exceptional Optics: Clear and bright images. Enhances target acquisition.
- Customer Support: Nightforce provides excellent after-sales support. This ensures customer satisfaction.
Nightforce scopes stand out in the market. Their features and benefits make them a preferred choice.
Preparation Steps
Before you can enjoy the precision of a Nightforce scope, it’s crucial to get the preparation steps right. Proper preparation ensures that the sighting process is smooth and accurate. This section will cover the essential steps you need to take before you start sighting in your scope.
Gathering Necessary Tools
Start by collecting all the tools you need. Here’s a list:
- Nightforce scope
- Rifle with a stable mount
- Quality ammunition
- Bore sighter
- Screwdriver set
- Rangefinder
- Targets for sighting in
- Cleaning kit for maintenance
Check that all tools are in good condition. It’s important to use quality equipment to ensure accuracy.
Setting Up Your Work Area
Choose a safe, well-lit space. The area should be free from distractions and hazards. Here are some tips for setting up:
- Find a stable shooting bench or table.
- Place your rifle securely on a rest or bipod.
- Set up targets at a known distance.
- Ensure you have a clear line of sight to the targets.
- Keep all your tools within easy reach.
Having a well-organized work area helps maintain focus. It also ensures you have everything you need at hand. This can reduce the risk of errors.
Mounting The Scope
Mounting your Nightforce scope is a crucial step in ensuring accuracy. A proper mount guarantees that your scope stays aligned. This section will guide you on the best practices.
Proper Mounting Techniques
Start by selecting a quality mounting system. Use rings and bases that match your scope and firearm. Attach the bases to your rifle first. Ensure they are secure and tight.
Use a torque wrench to tighten screws. This prevents overtightening which can damage your scope. Refer to the manufacturer’s specifications for the correct torque settings.
Place the rings on the bases, leaving them slightly loose. This allows for adjustment once the scope is in place. Position the scope in the rings. Adjust its position for proper eye relief.
Ensuring Stability
To ensure stability, tighten the screws on the rings evenly. Start with a moderate torque and gradually increase it. This prevents any misalignment.
Check the bubble level to ensure the scope is level. An uneven scope can affect accuracy. Adjust the scope until it is perfectly level.
Finally, test the setup by shouldering the rifle. Look through the scope to ensure a clear view. Make any final adjustments needed.

Credit: sandsarchery.com
Initial Adjustments
Before you can make accurate shots with your Nightforce scope, you need to make some initial adjustments. These adjustments ensure your scope is set up properly for your shooting needs. Let’s start with focusing the reticle and aligning the crosshairs.
Focusing The Reticle
Focusing the reticle is the first step in setting up your Nightforce scope. Follow these simple steps:
- Look through the scope at a plain, bright background.
- Turn the eyepiece focus ring until the reticle becomes sharp and clear.
- Take brief glances through the scope to prevent eye strain.
Repeat these steps until the reticle is perfectly in focus. This ensures you can aim accurately.
Aligning The Crosshairs
Aligning the crosshairs is crucial for accurate shooting. Here’s how you can do it:
- Mount the scope on your firearm securely.
- Use a gun vise or rest to keep the firearm stable.
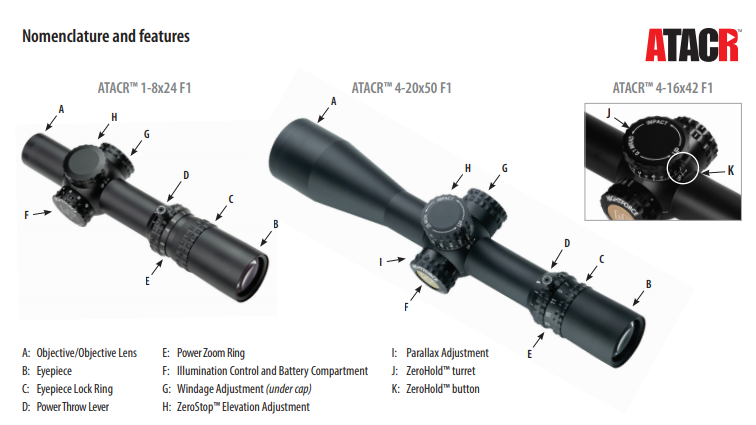
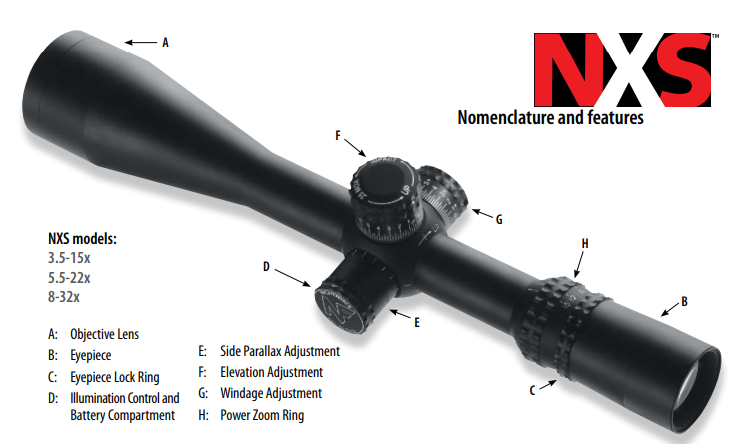
- Look through the scope and adjust the elevation and windage knobs.
- Ensure the crosshairs align with your target.
Make small adjustments and check the alignment after each adjustment. Proper alignment helps in hitting your target accurately.
By focusing the reticle and aligning the crosshairs, you set a strong foundation for sighting in your Nightforce scope.
Bore Sighting
Bore Sighting is the first step in getting your Nightforce scope on target. This process aligns your scope with the barrel before you fine-tune it. It saves time and ammunition. There are two main methods: using a bore sighter and manual bore sighting.
Using A Bore Sighter
A bore sighter is a tool that helps align your scope with the barrel. It makes the process faster and more accurate.
- First, secure your rifle on a stable surface.
- Next, insert the bore sighter into the barrel.
- Look through your scope and adjust the reticle to match the bore sighter’s point.
Using a bore sighter is simple and effective. It helps ensure your first shots are close to the target.
Manual Bore Sighting
Manual bore sighting requires no special tools. Just follow these steps:
- First, remove the bolt of your rifle.
- Secure your rifle on a stable surface.
- Look through the barrel and center it on a target about 25 yards away.
- Without moving the rifle, look through the scope and adjust the reticle to match the target seen through the barrel.
Manual bore sighting is a reliable method. It helps you get close to your target before fine-tuning.

Credit: m.youtube.com
Range Setup
Sighting in your Nightforce scope requires proper range setup. Ensuring an accurate setup is crucial for precise shooting. This section will guide you through choosing the right distance and setting up targets.
Choosing The Right Distance
Selecting the correct distance is vital. For most rifles, start at 100 yards. This distance is standard for many shooters. It provides a good balance between visibility and accuracy.
If you’re working with a different type of firearm, adjust accordingly. For handguns, consider starting at 25 yards. For long-range rifles, you might start at 200 yards or more. Always consult your firearm’s manual for specific recommendations.
Once you’ve chosen your distance, mark it clearly. Use a measuring tape or rangefinder. Accuracy at this stage is important for the entire process.
Setting Up Targets
Setting up targets correctly is essential. Use high-contrast targets for better visibility. Black and white targets work well.
Place your targets securely to avoid movement. Use a sturdy target stand or a fixed backstop. Ensure the target is at the correct height for your shooting position.
Consider using multiple targets. This allows for easy adjustments. You can compare shots without moving the target constantly.
Double-check your setup before starting. Ensure everything is secure and at the correct distance. A well-prepared range setup leads to better sighting in of your Nightforce scope.
Zeroing The Scope
Zeroing the scope is crucial for accurate shooting. It ensures your Nightforce scope is aligned with your rifle. This process involves adjusting windage and elevation. Let’s dive into the steps to zero your scope.
Making Windage Adjustments
Start by setting up your target at 100 yards. Fire a few shots to see where they hit. If the shots are left or right of the target, you need windage adjustments. Use the windage knob on your Nightforce scope. Turn it slowly to move the reticle left or right. Keep checking your shots until they align with the target’s center.
Elevation Adjustments
Next, focus on elevation adjustments. These are necessary if your shots are high or low. Use the elevation knob on the scope. Turn it to move the reticle up or down. Fire more shots to verify your adjustments. Continue until your shots hit the center of the target. This ensures your scope is zeroed for accurate shooting.
Fine-tuning
Once you have adjusted the major settings of your Nightforce scope, it’s time to fine-tune. This step ensures your scope is perfectly aligned for precision. The goal is to achieve consistent accuracy. Let’s dive into the details of fine-tuning.
Shooting Groups For Accuracy
To begin, shoot a series of three to five shots at the target. This grouping helps assess the accuracy of your scope. Consistent groups indicate that your scope is nearly zeroed in. If the group is off-center, make minor adjustments.
Adjust the windage and elevation knobs. Move the point of impact closer to the center. Make small changes and shoot another group to check improvement. Repeat this process until your groups are consistently hitting the center.
Recording Your Settings
Keep a record of your adjustments. This helps maintain accuracy over time. Use a notebook or a digital document to log each change. Include details such as:
- Windage and elevation settings
- Distance to target
- Weather conditions
Here is a sample table to organize your data:
| Setting | Value |
|---|---|
| Windage | 2 clicks right |
| Elevation | 3 clicks up |
| Distance | 100 yards |
| Weather | Clear, 70°F |
Regularly update your records. This ensures you can easily return to your preferred settings. Accurate logging saves time during future adjustments.
Maintenance Tips
Proper maintenance of your Nightforce scope ensures its long-term performance and reliability. Regular cleaning and correct storage are crucial. Let’s dive into some key maintenance tips.
Cleaning The Scope
Cleaning your Nightforce scope regularly is essential. Use a soft brush to remove dust. Avoid touching the lenses with your fingers. Use a lens cleaning solution and a microfiber cloth. Clean in gentle circular motions. Don’t forget to clean the exterior as well. This prevents dirt buildup.
Storage Best Practices
Store your Nightforce scope in a cool, dry place. Avoid direct sunlight and moisture. Use a protective case for added safety. This prevents accidental damage. Ensure the scope is securely mounted when not in use. Keep it away from harsh chemicals. These can damage the scope’s surface.
Common Mistakes To Avoid
When sighting in a Nightforce scope, avoiding common mistakes is crucial. These errors can affect your shooting accuracy and damage your equipment. In this section, we will discuss some common mistakes and how to avoid them.
Over-tightening Mounts
One common mistake is over-tightening the scope mounts. This can cause several issues:
- Damage to the scope tube.
- Misalignment of the scope.
- Inconsistent shot placement.
To avoid over-tightening, use a torque wrench. Follow the manufacturer’s recommended torque settings. This ensures the mounts are secure without damaging the scope.
Neglecting Environmental Factors
Another common mistake is neglecting environmental factors. These can have a significant impact on your accuracy:
- Wind can push your bullet off course.
- Temperature changes can affect bullet trajectory.
- Light conditions can alter your sight picture.
Always consider these factors when sighting in your scope. Adjust your aim and settings to account for wind, temperature, and light.
Frequently Asked Questions
How Do You Adjust A Nightforce Scope?
To adjust a Nightforce scope, use the turrets to zero in on your target. Follow the manual for windage and elevation settings. This ensures accuracy.
What Distance Should I Sight In My Nightforce Scope?
Sighting in at 100 yards is standard for most purposes. However, adjust based on your specific shooting needs and conditions.
Why Is My Nightforce Scope Not Holding Zero?
If your scope isn’t holding zero, check for loose mounts or rings. Ensure all screws are tightened and recheck your zero.
How Often Should I Sight In My Nightforce Scope?
Re-sight your scope after any significant impact or change in ammunition. Regularly checking ensures consistent accuracy and reliability.
Conclusion
Sighting in a Nightforce scope is straightforward with the right steps. Start with a solid mount and proper alignment. Use a stable rest for accuracy. Adjust windage and elevation knobs carefully. Take your time and make small adjustments. Practice regularly to maintain precision. Once you have dialed in your Nightforce scope, you may want to explore different brands and styles. For those curious about how to sight in a Vortex Viper, the process is equally simple yet requires attention to detail. Remember to verify your settings and confirm zero before heading out for a session, as consistent practice will help you adapt to any changes in your shooting environment.
A well-sighted scope enhances your shooting performance. Follow these steps, and enjoy better accuracy on your next outing. Happy shooting!


