DIY Deer Blind Projects: Build Your Own Hunting Hideout
Interested in creating your own deer blind? Discover DIY deer blind projects to enhance your hunting experience.
Hunting requires patience, skill, and the right setup. A deer blind can significantly improve your chances of a successful hunt. Building your own deer blind offers customization, cost savings, and a sense of accomplishment. From simple designs to more complex structures, there are many options to fit your needs and budget.
Whether you are an experienced hunter or just starting out, these projects can provide the perfect hideaway. Keep reading to explore various DIY deer blind ideas that you can build with basic tools and materials. Get ready to take your hunting game to the next level with these practical and creative projects.
Introduction To Diy Deer Blinds
For hunting enthusiasts, a deer blind is essential. It offers a safe and hidden spot to observe and hunt deer. Building your own deer blind can be rewarding and cost-effective. With a few tools and materials, you can create a customized deer blind that meets your needs. This guide will introduce you to the world of DIY deer blinds.
Benefits Of Building Your Own
Creating your own deer blind has many benefits. Here are some key advantages:
- Customization: Tailor the design to your specific needs.
- Cost Savings: Save money by using affordable materials.
- Quality Control: Ensure the blind is built to last.
- Satisfaction: Enjoy the pride of building something yourself.
Cost-effective Solutions
Building a deer blind doesn’t have to break the bank. There are several cost-effective solutions available:
| Material | Cost | Durability |
|---|---|---|
| Wood Pallets | Low | Medium |
| PVC Pipes | Moderate | High |
| Camouflage Netting | Low | Medium |
Using recycled materials is a great way to keep costs down. Wood pallets are often available for free or at a low cost. PVC pipes are lightweight and durable, making them ideal for framework. Camouflage netting provides excellent coverage without being expensive.
By choosing these materials, you can create a functional and durable deer blind without spending a lot. With some creativity and effort, a DIY deer blind can be both practical and affordable.
Planning Your Deer Blind
Building a deer blind requires careful planning. Proper planning ensures your blind is effective and comfortable. Let’s explore key elements of planning your deer blind.
Choosing The Right Location
Choosing the right location is crucial for a successful deer blind. Consider these factors:
- Deer Movement Patterns: Locate areas where deer frequently travel. Check trails and feeding spots.
- Wind Direction: Place your blind where the wind won’t carry your scent to the deer.
- Cover and Concealment: Use natural cover like trees and shrubs. This helps your blind blend in.
- Accessibility: Ensure your blind is easy to reach. Avoid disturbing the area too much.
Design And Layout Ideas
Designing your deer blind involves creativity and functionality. Here are some ideas:
| Design Element | Description |
|---|---|
| Size | Decide on a size. Ensure it’s comfortable for you and your gear. |
| Materials | Choose sturdy materials. Consider wood, metal, or natural elements. |
| Windows | Include multiple windows. This allows for better visibility and shooting angles. |
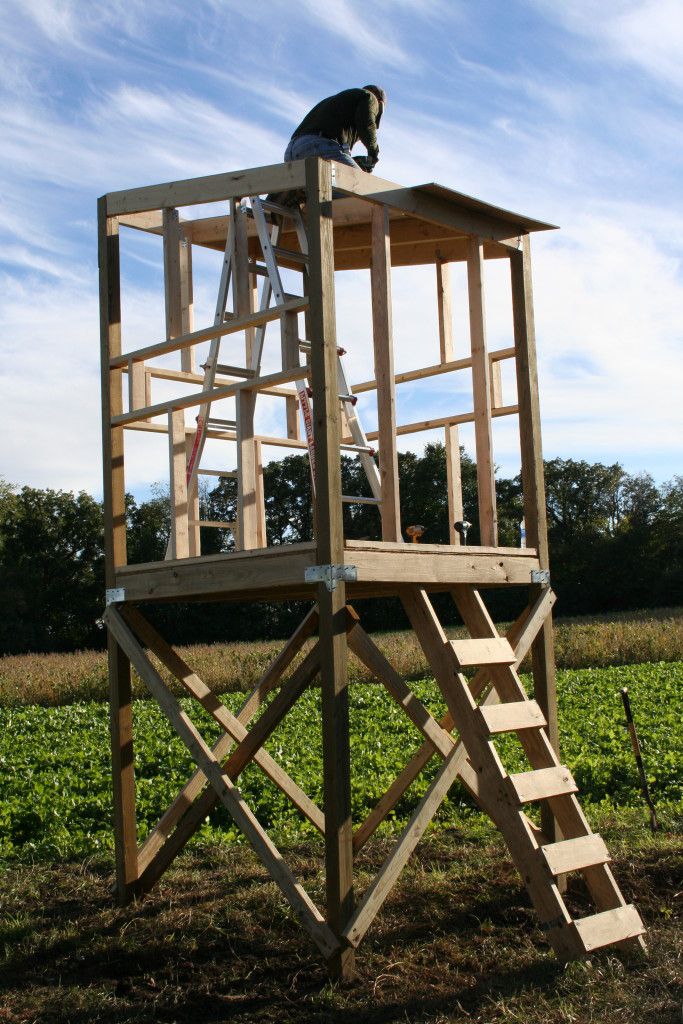
| Elevated or Ground | Decide if your blind will be elevated or on the ground. Elevated blinds offer better visibility. |
| Comfort | Add seating and insulation. Spending hours in your blind should be comfortable. |
Remember, the goal is to create a space that supports your hunting needs. Incorporate your personal preferences in the design.
Essential Materials And Tools
Creating your own deer blind can be a rewarding project. To get started, you’ll need the right materials and tools. This section will help you gather everything necessary for a successful build.
Basic Building Materials
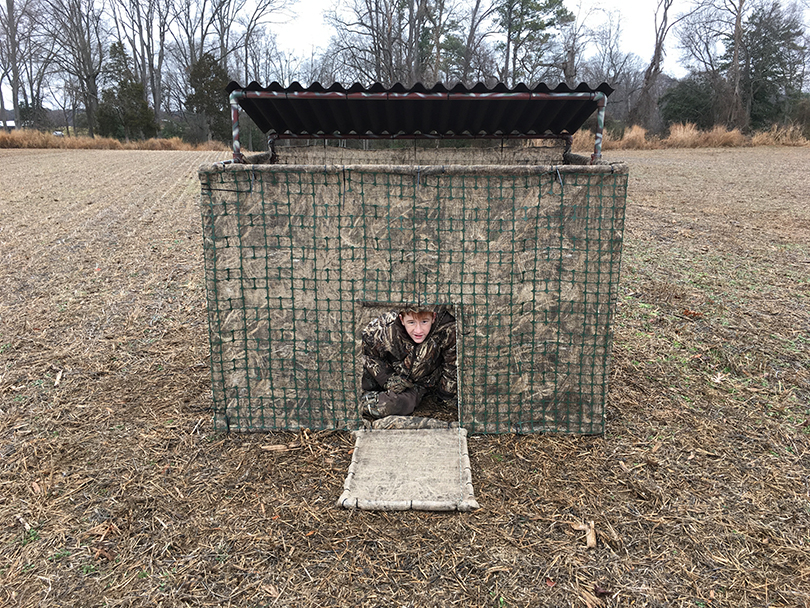
Begin with wood. Plywood and lumber are essential. Choose sturdy pieces that can withstand the elements. You’ll need screws and nails to hold everything together. Make sure you pick the right sizes. Weather-resistant paint is also important. It protects the wood and helps your blind blend into the surroundings. Camouflage netting is another key material. It hides your blind from deer while allowing you to see out.
Must-have Tools For Construction
A tape measure is crucial. Accurate measurements ensure your blind fits together well. A saw is needed to cut wood to size. A drill makes it easier to drive screws into wood. A hammer is necessary for nails. A level helps keep everything straight and stable. Don’t forget a paintbrush or roller to apply your weather-resistant paint. Safety gear is also important. Wear gloves and safety glasses to protect yourself during the build.

Credit: www.youtube.com
Step-by-step Building Guide
Building your own deer blind can be a rewarding project. This guide walks you through each step. You’ll have a sturdy deer blind by the end. Let’s get started!
Foundation And Base
The foundation is crucial for stability. Start by selecting a flat, dry area. You’ll need these materials:
- Concrete blocks
- Pressure-treated lumber
- Gravel
Follow these steps:
- Clear the area of debris.
- Place concrete blocks evenly spaced.
- Cover the area with a layer of gravel.
- Lay the pressure-treated lumber on the blocks.
The base should be level and secure. This ensures the deer blind will be stable.
Constructing The Frame
Next, build the frame. Gather these materials:
- 2×4 lumber
- Nails or screws
- Hammer or drill
Follow these steps:
- Cut the 2×4 lumber to the desired height and width.
- Build the four walls separately.
- Use nails or screws to secure the corners.
- Stand the walls up and attach them to the base.
Make sure the frame is square and level. This ensures the deer blind is sturdy. Add cross-bracing for extra support.
Adding Walls And Roof
Building a DIY deer blind is exciting. Adding walls and a roof is a crucial step. This part ensures your blind provides adequate shelter. It keeps you hidden and protected from the elements. Let’s dive into the process.
Insulating Your Blind
Insulation keeps you warm during cold hunting seasons. Use materials like foam board or fiberglass. These are easy to install and effective.
Foam board: Cut the foam board to fit between the wall studs. Secure with adhesive or screws. It provides great thermal resistance.
Fiberglass: This material is also a good insulator. Wear gloves and a mask while handling. Fit it snugly between wall studs.
Weatherproofing Tips
Weatherproofing ensures your blind lasts longer. It keeps you dry and comfortable. Here are some key tips:
- Seal gaps: Use caulk or weatherstripping to seal any gaps.
- Roof materials: Choose durable materials like metal or asphalt shingles.
- Sloped roof: Design the roof with a slope to prevent water buildup.
Install a drip edge to keep water from seeping in. This will protect the walls from moisture damage.
Pro Tip: Paint the exterior walls with waterproof paint. This adds an extra layer of protection.
Roofing felt: Place roofing felt under your final roofing material. This adds another layer of weather resistance.
By following these steps, your DIY deer blind will be cozy and weatherproof. Happy hunting!
Interior Setup
Creating a cozy and functional interior for your DIY deer blind is essential. This enhances your hunting experience and keeps you comfortable. Focusing on seating options and storage solutions will help you achieve the perfect setup.
Comfortable Seating Options
Comfortable seating is a must for long hours in your deer blind. Choose from various options to suit your needs:
- Folding Chairs: Lightweight and easy to transport. Ideal for quick setups.
- Swivel Chairs: Provides a 360-degree view. Helps you stay alert and ready.
- Padded Seats: Add a cushion for extra comfort. Makes long sits more bearable.
Storage Solutions
Efficient storage keeps your gear organized and within reach. Consider these storage ideas:
| Storage Type | Features |
|---|---|
| Shelves | Easy to install. Perfect for small items like binoculars and calls. |
| Hooks | Great for hanging bags and clothing. Keeps the floor clear. |
| Bins | Store larger items like extra layers and food. Stackable for space-saving. |
Keep your deer blind tidy and efficient. Simple storage solutions make a big difference.
Camouflage Techniques
When creating a DIY deer blind, effective camouflage techniques can make a big difference. Camouflage helps you blend with the environment, making it harder for deer to spot you. Below, we explore some essential camouflage techniques to enhance your deer blind project.
Blending With The Environment
Blending your deer blind with the environment is crucial. Observe the colors and textures around your hunting area. Use paint or fabric that matches these natural elements. Choose shades of green, brown, and gray. These colors help your blind disappear into the landscape.
Consider the season. In fall, use more browns and oranges. In spring, greens and lighter browns work better. Pay attention to the background. If there are many trees, add vertical lines to your blind. This mimics tree trunks and helps you stay hidden.
Using Natural Materials
Using natural materials enhances your blind’s camouflage. Collect branches, leaves, and grass from the area. Attach these materials to your blind. This creates a natural look that blends seamlessly with the surroundings.
Here are some tips:
- Use zip ties or string to secure branches and leaves.
- Layer materials for a more realistic appearance.
- Avoid using artificial materials that stand out.
Creating a natural look takes time, but the results are worth it. Your blind will look like part of the environment, increasing your chances of success.

Credit: www.simplifiedbuilding.com
Safety Tips And Maintenance
Building your own deer blind can be a rewarding project. But safety is essential. Proper maintenance ensures your deer blind stays safe and functional for many seasons. Below, we discuss key tips to keep in mind.
Ensuring Structural Stability
Ensuring structural stability is crucial. Start with a solid foundation. Use sturdy materials like treated wood or metal. These materials resist weather damage and pests. Regularly inspect joints and fasteners. Tighten loose screws and replace damaged parts.
Consider adding support braces. They provide extra stability and can prevent collapse. If your deer blind is elevated, check the ladder or steps. Ensure they are secure and free of rot. A strong structure ensures your safety while hunting.
Regular Maintenance Routines
Regular maintenance routines keep your deer blind in top shape. Create a checklist to follow each season. Start by cleaning the interior and exterior. Remove debris, leaves, and any nests or webs.
- Inspect the roof: Check for leaks or damage. Repair small holes to prevent water from entering.
- Check windows and doors: Ensure they open and close smoothly. Lubricate hinges if needed.
- Look for signs of wear: Replace any worn-out materials, like weather stripping or seals.
- Test for pests: Check for signs of rodents or insects. Use repellents or traps as necessary.
Regularly repaint or seal the exterior. This protects against weather damage. Keep an eye on the flooring. Replace any rotted or warped boards. Regular upkeep extends the life of your deer blind and ensures a safe hunting experience.
Enhancements And Upgrades
Enhancing and upgrading your DIY deer blind can significantly improve your hunting experience. Simple modifications can make your blind more comfortable and functional. These improvements can also increase your chances of a successful hunt. Below are some practical upgrades to consider.
Adding Windows And Shooting Ports
Adding windows to your deer blind can improve visibility. You can keep an eye on the surroundings without making noise. Use plexiglass for durability and clear views. Make sure the windows are easy to open and close. This will help you stay quiet and concealed.
Shooting ports are also essential. They allow you to aim and shoot without moving much. Position them at a comfortable height. Ensure they are wide enough for your weapon. This small upgrade can make a big difference in your hunting success.
Installing Heaters And Ventilation
A heater can be a game-changer in cold weather. It will keep you warm and focused. Choose a small, portable heater for convenience. Ensure it is safe to use in enclosed spaces. Proper ventilation is crucial. It will prevent the build-up of fumes and keep the air fresh.
Install vents near the top and bottom of your blind. This will allow for better air circulation. You can also use a small fan to improve airflow. These upgrades will make your time in the blind more comfortable. They will allow you to stay longer and increase your chances of success.
Conclusion And Final Thoughts
Creating your own deer blind can be a rewarding project. It offers a personalized hunting experience and potential cost savings. With a bit of effort and creativity, you can craft a blind that meets your specific needs.
Creating your own deer blind can be a rewarding project. It allows you to customize the design to fit your needs. You can choose the best materials and location for your hunting spot. Building a deer blind can also be a fun and educational experience. You learn new skills and gain a sense of accomplishment.Enjoying Your Hunting Experience
A well-built deer blind makes hunting more comfortable. You stay hidden from deer, increasing your chances of a successful hunt. A good blind can protect you from the elements. Rain, wind, and cold are less of a problem. You can also enjoy more time outdoors. Spend quiet moments in nature, waiting for that perfect shot.Inspiring Future Projects
Completing a deer blind project can spark new ideas. Maybe you will build a better version next season. Or perhaps you will create other outdoor projects. Think about making birdhouses, feeders, or even a new shed. Each project helps you improve your skills. Building things with your own hands can become a rewarding hobby. It keeps you active and creative. Try new projects and see what you can achieve. The possibilities are endless. “`
Credit: www.pinterest.com
Frequently Asked Questions
How To Build A Diy Deer Blind?
Building a DIY deer blind involves selecting materials, planning the design, and following construction steps. Use wood, nails, and camo paint. Ensure stability and safety.
What Materials Are Needed For A Deer Blind?
You’ll need plywood, nails, screws, camo paint, and basic tools. Insulation can be added for warmth.
How High Should A Deer Blind Be?
A deer blind should be elevated 10-15 feet off the ground. This height provides a good vantage point.
Can I Use Recycled Materials For A Deer Blind?
Yes, you can use recycled materials. Pallets, old plywood, and other reclaimed wood work well for construction.
Conclusion
Building a DIY deer blind can be a fun project. It offers a great way to enjoy the outdoors. Plus, it saves money and adds a personal touch to hunting. Choose the right materials and follow clear plans. Safety is key, so take your time and do it right.
Share your success and inspire others. Happy building and good luck with your hunting season!


