Deer Stand Plans How to Build: Step-by-Step Guide
Building a deer stand can elevate your hunting experience. It offers a great vantage point and a safer environment.
Creating a deer stand might seem daunting, but it’s quite achievable with the right plan. A well-built deer stand ensures you have a clear view of the surroundings, giving you the advantage of spotting deer from a distance. With some basic tools and materials, you can construct a sturdy, reliable stand.
This guide will walk you through the steps, providing tips to make the process smooth and successful. Whether you’re a seasoned hunter or a beginner, you’ll find valuable insights here. Let’s dive into the essentials and get started on building your own deer stand.
Introduction To Deer Stands
Deer stands are important for hunting. They help hunters see deer better. Being higher up gives a better view. It also keeps hunters out of the deer’s sight. Deer stands make hunting safer and more successful.
Hunters use deer stands to get a better look at deer. A good deer stand keeps hunters hidden. This helps them get closer to deer. Deer stands also keep hunters safe. They are less likely to be seen or smelled by deer.
There are many kinds of deer stands. Some are simple, like a ladder stand. Others are more complex, like a box stand. Ladder stands are easy to move. Box stands are very sturdy. Each type has its own benefits. Choose the right one for your needs.

Credit: www.youtube.com
Planning Your Deer Stand
Select a spot with a clear view. Look for game trails or feeding areas. Ensure the area is safe from high winds. Consider the direction of the sunrise and sunset. This helps avoid sun glare.
Build a sturdy platform. Use strong materials like treated wood. Ensure the stand can hold your weight. Plan for enough space to move. Create a comfortable seat. Safety rails are important. Think about camouflage. Blend the stand with the surroundings. Make sure it’s easy to climb.
Materials And Tools
Wood is the main material for a deer stand. Use pressure-treated wood. This wood lasts longer. You’ll also need nails or screws. They hold the wood together. Get metal brackets for extra support. Buy paint or sealant to protect the wood from weather.
A saw is needed to cut the wood. Use a hammer or screwdriver to fix nails or screws. A tape measure helps in getting the right size. Level is used to make sure your stand is even. Have a ladder for reaching high places. Wear safety glasses to protect your eyes.
Building The Foundation
Clear the area where the deer stand will go. Remove any rocks, roots, and debris. Make sure the ground is level. Use a shovel and rake to smooth the soil. Mark the spots for the posts with stakes.
Dig holes for the posts. Each hole should be deep and wide enough for stability. Place a post in each hole. Use a level to make sure each post is straight. Fill the holes with concrete. Let the concrete dry completely.
Constructing The Frame
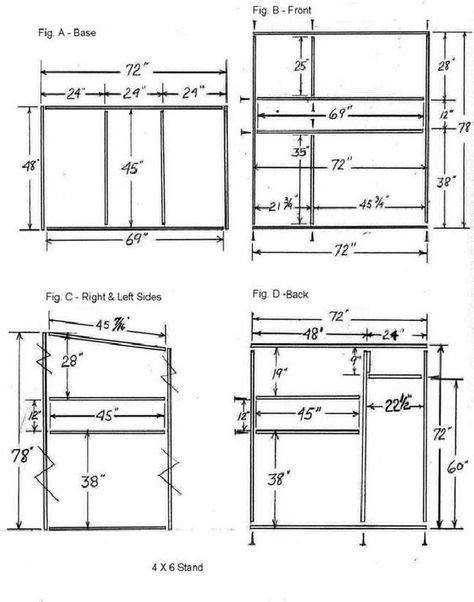
Start with a sturdy base. Use strong wood. Cut four pieces to the desired length. Make sure they are even. Lay them out in a square. Nail or screw the corners together. Check for level. Add support beams in the middle. This will hold the weight. Ensure everything is tight.
Cut the wall pieces. They should be the same size. Attach them to the base. Use nails or screws. Make sure they are straight. Add support beams inside the walls. This will make them strong. Check for gaps. Fill any gaps. Ensure everything is secure.

Credit: www.pinterest.com
Adding The Roof
Choose strong, light materials for the roof. Metal sheets are a good choice. They are durable and easy to install. Plywood can also work well. It is strong and not too heavy. Waterproof materials are important. They keep the inside dry.
Place the roofing materials on the frame. Secure them with nails or screws. Make sure the edges overlap. This stops water from getting inside. Check that all pieces are tight. Loose parts can be dangerous. Finally, inspect your work. Ensure everything is secure.
Finishing Touches
Create the perfect deer stand with our easy-to-follow plans. Detailed instructions make building a sturdy and comfortable structure simple. Enhance your hunting experience with these practical finishing touches. Whether you’re a seasoned hunter or a beginner, our deer hunting stand plans explained will guide you through every step of the process. Choose the materials that best suit your environment, and don’t forget to incorporate features like camouflage and safety harnesses for added protection. With thoughtful design and execution, your deer stand will not only blend into the landscape but also provide an enjoyable and successful hunting experience.
Painting And Sealing
Adding paint and sealant protects your deer stand from the weather. Choose weather-resistant paint for durability. Apply at least two coats for a strong finish. Let each coat dry before adding the next one. Sealing the wood prevents rot and damage. Use a high-quality sealant for best results. Apply the sealant after the paint is completely dry. This keeps your stand safe and long-lasting.
Adding Comfort Features
Comfort features make your deer stand a pleasant place to spend time. Cushioned seats add comfort for long waits. Insulate the interior for warmth in cold weather. Install hooks to hang gear and keep it organized. Adding a small shelf can hold snacks and drinks. A floor mat keeps the space clean and dry. These features make hunting more enjoyable.

Credit: www.youtube.com
Safety Tips
Use strong materials like treated wood or metal. Check all bolts and screws regularly. Loose parts can be dangerous. Make sure the stand is firmly attached to the ground. Test the stability before use. Always use a ladder or steps designed for the stand.
Wear a safety harness at all times. Never climb with a loaded gun or bow. Use a rope to pull up gear. Keep the platform clean and dry. Avoid moving too much. Sudden movements can unbalance the stand. Always let someone know your location.
Maintenance Tips
Building a deer stand requires careful planning and sturdy materials. Ensure proper measurements and secure joints for safety. Regular inspections help maintain stability and longevity.
Regular Inspections
Check your deer stand often. Look for loose bolts and rusty parts. Make sure the wood is in good shape. Inspect the ladder for stability. Ensure the platform is secure. Always check the safety harness. This will keep you safe. Inspect the roof for leaks. Look for any animal damage. Regular checks make your stand last longer.
Repair And Upkeep
Fix any loose parts right away. Replace any damaged wood. Paint or seal the wood to protect it. Tighten all the bolts and screws. Oil any metal parts to prevent rust. Clean the ladder and platform. Clear any debris around the stand. This will help prevent accidents. Keeping your stand in good condition is important.
Frequently Asked Questions
What Materials Do I Need For A Deer Stand?
To build a deer stand, you’ll need wood, screws, nails, a hammer, saw, and measuring tape. Additionally, consider safety gear like gloves and goggles.
How High Should A Deer Stand Be?
A deer stand should typically be between 10 to 20 feet high. This height provides a good vantage point for spotting deer without being easily detected.
Can I Build A Deer Stand Alone?
Yes, you can build a deer stand alone. However, having a helper can make the process quicker and safer, especially when lifting heavy materials.
What Are The Best Wood Types For A Deer Stand?
Pressure-treated pine and cedar are the best wood types for a deer stand. They are durable, weather-resistant, and can withstand outdoor conditions.
Conclusion
Building your own deer stand is rewarding and practical. The process is straightforward with the right plans. You save money and customize it to your needs. Basic tools and materials will suffice. Follow the steps, and you’ll have a sturdy stand.
Enjoy better hunting experiences. Happy building and safe hunting!


